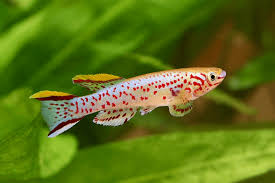
Breeding killifish can be a rewarding experience for aquarium enthusiasts. These small, colorful fish exhibit fascinating breeding behaviors, and understanding the process ensures successful reproduction. Whether you’re breeding annual or non-annual killifish, providing the right environment, care, and attention to detail is essential. This step-by-step guide will walk you through the breeding process to help you raise healthy fry.

Understanding the Two Types of Killifish Breeders
Before beginning the breeding process, it’s important to understand the two types of killifish breeders: annual breeders and non-annual breeders.
Annual Breeders
Annual killifish, like Nothobranchius species, come from temporary water bodies that dry up during certain seasons. These fish lay eggs that can survive in dry conditions until the next rainy season when the water returns. In captivity, you must simulate this process to successfully breed annual killifish.
Non-Annual Breeders
Non-annual killifish, like Aphyosemion and Fundulopanchax species, originate from permanent water sources such as rivers and streams. These killifish breed year-round, and their eggs hatch within a few weeks. Non-annual killifish are generally easier to breed than annual ones because they don’t require the dry period for egg survival.
Step 1: Set Up a Breeding Tank
Setting up a proper breeding tank ensures the success of your killifish breeding project. Here are the essential requirements:
-
Tank Size: A small breeding tank of 5 to 10 gallons is sufficient for most killifish species. Ensure the tank is equipped with a lid to prevent escapes.
-
Water Conditions: Annual breeders prefer slightly acidic water (pH 6.0-7.0), while non-annual breeders thrive in neutral water (pH 7.0). Maintain the temperature between 72–78°F (22–26°C).
-
Substrate: Use a fine substrate or add spawning mops, soft plants, or peat moss, which help replicate the conditions killifish breed in naturally.
Annual Killifish Breeding Tank Setup
For annual breeders, set up a tank with peat moss or a sponge filter to mimic the drying conditions. The eggs are laid in the peat moss, where they remain until the tank is flooded again.
Non-Annual Killifish Breeding Tank Setup
For non-annual breeders, a tank with soft plants or spawning mops allows the fish to lay eggs that hatch after a few weeks. A light filter will help maintain clean water while avoiding strong currents.
Step 2: Prepare the Breeding Pairs
Select healthy breeding pairs to ensure good genetics and a higher chance of successful reproduction. Choose one male and one or two females, as males can become aggressive toward each other. Observe their behavior for signs of readiness to breed, such as the males displaying brighter colors and increased swimming activity.
Ensure both fish are well-fed with a nutritious diet, including live foods like brine shrimp, daphnia, and bloodworms. This helps improve their condition and encourages breeding behaviors.
Step 3: Introduce the Breeding Pair to the Tank
Carefully introduce the breeding pair to the prepared breeding tank. Keep the water temperature stable, and provide hiding spots or plants to reduce stress.
-
For annual breeders, place peat moss or a fine substrate in the tank to simulate the seasonal drying of their natural habitat.
-
For non-annual breeders, ensure there are plenty of plants or spawning mops for the fish to lay eggs on.
Monitor their behavior closely. Males often court females by displaying their bright colors and performing elaborate swimming displays. Female killifish will lay their eggs on surfaces like plants, moss, or in the peat moss.
Step 4: Egg Collection and Incubation
Once the female lays eggs, you can either leave the eggs in the breeding tank or collect them for incubation.
For Annual Killifish
After a few days of egg-laying, carefully remove the peat moss or substrate containing the eggs. Keep the eggs in a dry container, ensuring they are not exposed to moisture.
Allow the eggs to incubate for several weeks. When it’s time to “flood” the eggs, carefully add water to the container, simulating the rainy season. The eggs will hatch once the water returns, and the fry will be ready to swim.
For Non-Annual Killifish
For non-annual killifish, simply leave the eggs in the tank. They will hatch within 2-3 weeks. Once hatched, remove the adults to prevent them from eating the fry.
Step 5: Caring for the Fry
Once the fry hatch, they are tiny and delicate. Provide plenty of small food like infusoria, newly hatched brine shrimp, or finely crushed flakes. Keep the water clean by performing regular water changes and using a sponge filter to ensure the fry have a safe and healthy environment.
Monitor the fry for growth and ensure they’re developing properly. As they grow, you can gradually introduce larger food options, such as daphnia or small worms.
Step 6: Maintaining the Breeding Program
Breeding killifish is an ongoing process, especially for annual species that require regular egg collection and hatching. It’s essential to maintain a healthy breeding tank with stable water conditions. Rotate breeding pairs to prevent inbreeding and ensure healthy offspring.
Keep track of egg collection times and flood cycles for annual killifish to replicate their natural environment as accurately as possible.
Conclusion
Breeding killifish offers a fascinating insight into their natural behaviors and reproduction cycles. By setting up a proper breeding tank, providing the right care, and carefully monitoring the process, you can successfully breed both annual and non-annual killifish species. Whether you’re breeding them for display or research, following these steps ensures a successful and rewarding experience.